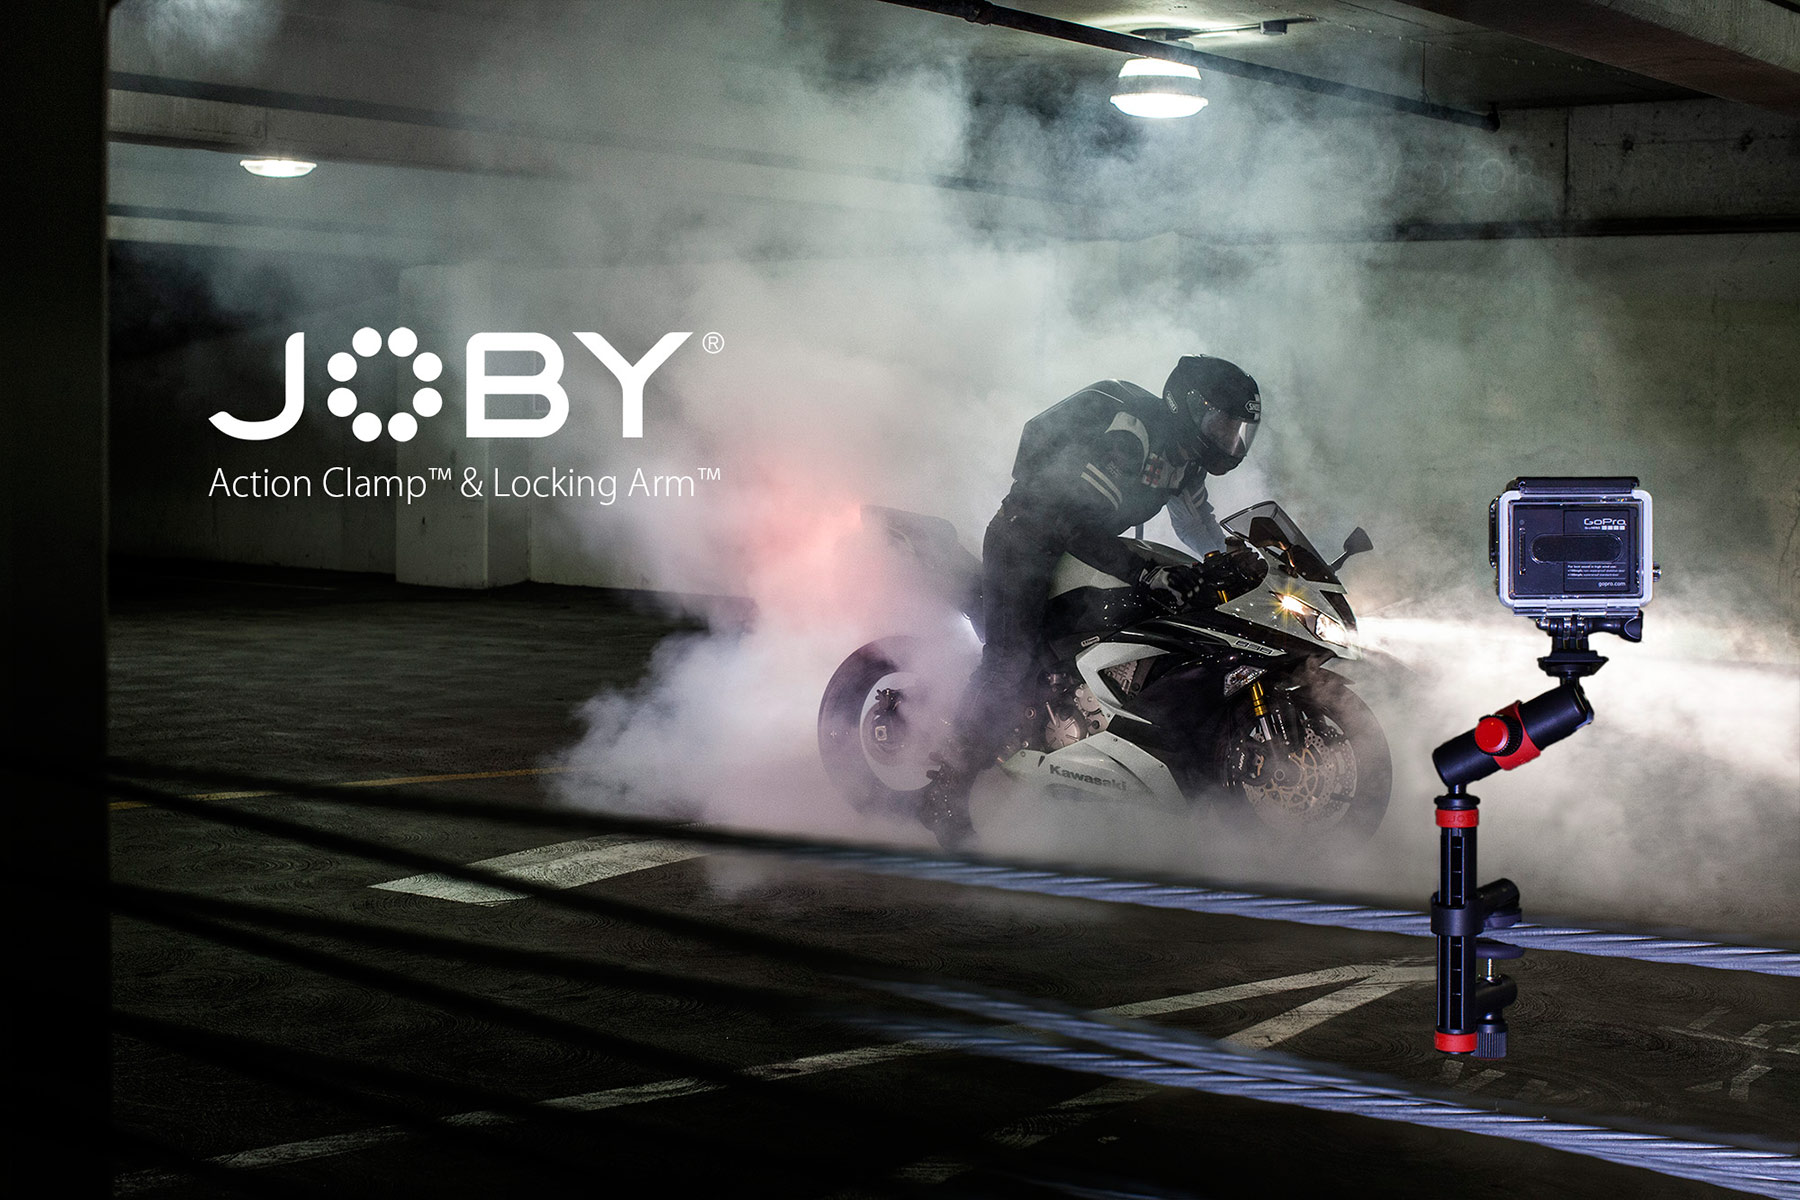
The making of the JOBY Action Clamp Ad “The Burnout”.
By: JOBY Photographer Zach Settewongse
I’m often asked how did you shoot that from people who are into photography. I also get comments like “Oh which Instagram filter did you use?” from those not into photography . . . 🙁
This is a behind the scenes look at what it took to create this action photography product image. You might be surprised at the work that goes into it?
The GOAL: Create an ad about the JOBY Action Clamp for GoPro, Sony, Contour, Drift or other action cameras that show the product used as intended, and do it awesomely.
Saturday 2pm
Step 1 – CONCEPT: This is the easy part as I use both GoPro and Contour action cameras daily during my work and could have kissed the designers when I saw the JOBY Action Series. Upon seeing the product I immediately thought this would be great for when I have to set up a GoPro quickly (in seconds), get my shot, and get out of dodge. I’m often frustrated with the GoPro mounting parts bits, the number of them I need to carry, and the time it takes to frame a shot with them. So while riding my bike I thought of the idea of a rider filming himself doing a burnout. At first I was thinking in the middle of a busy big city intersection but that changed as you’ll see below.
Step 2 – LOCATION SCOUT: This is seriously where almost all shoots start as the location can influence the final piece a lot. So I always begin by riding around on my bike and looking, going in alleys, by railroad tracks, industrial sites, new modern buildings, etc. I’m just getting ideas as I go and not dismissing anything; remember I said I already was thinking a busy intersection, but so many times before I’ve found something great is a just around the next block.
Down to two locations: Main intersection in old downtown Petaluma, CA or the parking garage close by. Why Petaluma, CA? Well because it is only 34 degrees outside and as much as I wanted to ride an hour into San Francisco at 2am to get my shot it was just too cold.
Saturday 7pm
Step 3 – TEST SHOTS – Time to head back out at night.
Now this sounds like I should take a test of the real planned shot but no. This is just to get a feel for how the elements will look on a bigger screen. Remember it’s a product shot so the product has to be placed right and there has to be plenty of room for the text that is sure to be placed on top of it later. An awesome shot with no clean area for copy will always get rejected; it’s sad but true 🙁
TIPS: Take notes:
- Make notes of your camera placement.
- Measure how far your product is from a fixed point
- Measure all the elements in the shot’s placement to the camera.
- Have a bag of fixed lenses. I always test with a 24,mm, 50mm, 85mm for this type of shot. Why? Two reasons. One because it’s a night shot and I want lenses with the lowest f-stop as possible. Two I’m not a huge fan of zoom lenses for ad shots. There is just a extra little bokeh (look it up) magic certain fixed lenses have. The Canon 24mm f1.4 has very little edge distortion if any. The Canon 50mm f1.2 is a staple of perfection giving you exactly what you see and low light magic. The Canon 85mm f1.2 can make a a subject absolutely pop; it’s a tricky lens to use but it can produce amazing results.
- Move around and look at the subject from all angles. Take more shots.
- Plan your get away 🙂
The Intersection: I had my mind set on this and found a nice architectural background. Idea one had it shot from the side of road with the JOBY Action Clamp clipped onto a mirror of another motorcycle. It wasn’t looking right, so how about a shot from the center of the road? That could work, maybe?

Parking Garage: Not digging it in testing but lets shoot a few shots anyways.

Saturday 9pm
Step 4 – REVIEW TEST SHOTS:
Hmm time to make a decision, I only have one rear tire for the shot and time to take one. I really struggle on this for all of five minutes and then go for the parking garage.
So what am I looking for? I want a cool background but it can not be distracting. The background is so, so important in any shot. When I look at the images on a big screen the intersection is out and the parking garage looks promising but could be too boring. When all the element of the shot come together it might work; we’ll see!
Saturday 12:30 am It’s getting late!
Step 5: THE SHOOT – it’s about time.
Place the elements: I positioned the motorcycle and the JOBY action Clamp with GoPro first. Easy since I took notes earlier and then made adjustments after looking at test shots. Check, double check looks good.

Camera & Lens: So I chose the Canon 50mm f-1.2 on a Canon 5D mk II body from testing. This combination is great for low light and the framing and focus DOF between the two subjects was best with the 50mm in this case. I wanted to use the 85mm but 50mm won out.
Place the Camera: I have a good idea of where I want the tripod. Exact placement of the tripod is important as it cannot be moved; you’re thinking “What?” I can’t give everything away but I almost always take multiple shots to create one image and no not like HDR.
START SHOOTING: I bet you’re thinking I should set up the lighting first? Well lets break down the shots:
Shot ONE
- Move all subjects shoot empty background. You might need this later and will kick yourself if you don’t have it.
- Put subjects back, remember I have measurements or marks. Check, double check! Is the product perfectly square ?. . if someones paying you it better be.
Shot TWO
- I use a JOBY Flare 125 to highlight the product and get sharp focus on product. Take a shot.

Shot THREE
- Elements: I need a shadow on that wall in front of the bike, so I use the headlight from my Mini Cooper (one light covered by a floor mat) to create it exactly where I want it. Take a shot.

Shot FOUR
- Additional elements: There is one more that is a lighting and focus trick combined. It is a subtle additional element layer that is right there in the photo. I’m keeping this one to me. Sorry 🙁 Take Photo.
Shot FIVE the cool one!
- I then place additional lights behind the bike. Two more JOBY Flare 125’s at max to backlight this shot.
- This is an action manly photo so it should be sharp. I’m shooting RAW, I always do and it’s a must for this photo for the sharpening effect I want. I’m thinking of the final product and not the photo I’m going to take next. OK time to get on the bike and do the burnout, it’s now 1:30am and Petaluma is about to wake up.
- . . . . Oops security just showed up and are watching, Pretend to do pre-shots for 10min until they get bored and leave.
- 1:45am their gone. I get on the bike and my assistant double checks focus. My assistant is my fiancee which is the only type of assistant you can find without pay, who will spend a whole day doing this, and stand there for an hour when it’s 34 degrees. She really is awesome! As I start the 30sec+ burnout which echoes intensely through the garage located adjacent the fire station I try to steady the bike as best as I can. The shutter speed on the camera is slow at 60 so if I’m not holding the bike still while the back tire is spinning it will be blurry. Shots are taken with remote rapid fire as fast as possible. She’s smiling so I know it looks good!
Holy Smokey! The final frame I end up using as the base is about 70% of the way through the burn out.

Step 6: GAG tire smoke is not pleasant to breathe and at this point I start dry heaving in my helmet. Thankfully I didn’t puke!
Saturday 2am
Step 7: PHOTOSHOP
- This is where I put all the shots together, all the elements. It’s all these small touches that make the image. I’m adding a few elements to the base final shot (step 5) and being subtle, really, really small adjustments.
- Change the bike color from green to white.
- Add a bit of gradient to the bottom. Those cables are a bit distracting.
- Add a bit of text.
- It’s 5am
It’s now 5am and I need to order a new tire before going to bed. I bet you never thought all of that went into that one image! Or maybe you did?
FINAL NOTE: Realize you will FAIL repeatedly. I FAIL miserably with shots from time to time. I can’t tell you how many times I thought I was going to have an epic shot and it didn’t pan out. But who cares just move on to the next idea YOU CAN create something awesome! Just believe in yourself and try, try again. After a few years I’ll admit I have much fewer fails but I think it’s only because I can see them coming sooner and move on to the next idea faster.
Hopefully you learned something from my long winded post. Onto the next shot.
Zach Settewongse – JOBY Photographer.


